How and Why to Start a Facebook Group
Facebook describes groups this way: “Facebook Groups are the place for small group communication and for people to share their common interests and express their opinion.” With all of the social media tasks, activities, and chores already on your busy plate, why start a Facebook Group?”
Bottom Line: Facebook Groups are akin to a private location on Facebook where like-minded people see your content. You do not need to pay to boost content in groups, and the members want to be there because they share a dedicated interest.
Fast Facts About Facebook Groups
A Facebook Group is unlike a Facebook Page in that the group need not be public. Group owners have control over privacy settings. If you want to make a Secret Group, for example, and you only want people who are invited to be there, this option is available. On a personal note, I’ve used Secret Groups when planning surprise parties. No one on Facebook can see a secret Group other than those in the Group. Maybe you have a sensitive topic for a group–for example, a health-related topic–a secret group may be helpful for your purpose.
If you join a Facebook Group, anything you share or post in the group is available to anyone on Facebook who is a member of that group.
How is a Facebook Group Different Than a Facebook Page?
Facebook Pages: A Facebook page is a profile for your organization as a public entity. Let’s use BlogPaws as an example. BlogPaws is a company that has a Facebook page called BlogPaws.
vs.
Facebook Groups: Within BlogPaws the company, there are also two Facebook groups: BlogPaws Social Learning Community and BlogPaws News and Boost Group.
Why not just put everything we want to share on Facebook right onto the BlogPaws Facebook Page? There are dedicated topics and items of interest that are best served by posting them in a group associated with BlogPaws. For example, five days a week, BlogPaws runs a chore thread challenge in the BlogPaws News and Boost Group. Folks who are a member of that group may partake in those boosts, and only folks in that group would be interested in helping other members gain traction on a chore, like asking for Facebook Likes. The average pet blogger, influencer, or pet parent would not be interested in chore threads, which is why they appear in a group and not on the main BlogPaws Facebook Page.
Facebook Page: As an online influencer, it is highly recommended that you have a Facebook Page. Let’s use my own blog, Fidose of Reality, as an example. My blog is an LLC and my blog is a business. I want followers and to post content, among other things, so I have a Facebook page. My blog is dog focused, and more specifically it is geared at “Health, Wellness, and Lifestyle for Cocker Spaniels and their canine friends.” I refined my blog’s niche this year to more Cocker-centric, but I still do health/wellness content for dogs in general.
Due to the above, I made a business decision to create a Cocker Spaniel Facebook group. I noticed that most Cocker Spaniel Facebook groups (that I have been a member of for a long time) did not focus on health and wellness, so boom: A Facebook group was born. I named it Club Cocker: Wigglebutts Worldwide. I hired someone to do a logo, and I launched about two months ago. At present, we have close to 600 members and they are a very engaged group. #squee
I still engage dog lovers in general on my Fidose of Reality Facebook Page. So it’s a win-win!
How to Start a Facebook Group: The Pre-Work
The process of starting a Facebook Group is super easy, so let’s get started with what to do BEFORE you start a Facebook Group.
(1) Determine WHY you want a Facebook group. If you plan to share the same type of content you do on your page, this is redundant and not necessary to form a Facebook group. If you have a specific niche in mind, as I did with Cocker Spaniel Health and Wellness, then a group would be a possibility for you.
(2) Have a goal for the group. Just like your blog, you need a focus and a goal. Give the group a name and give the group a purpose. What makes your group different than any other Facebook group?
(3) Once establishing you want a group and determining its name and focus, now you need to prep the group:
- How will you recruit members?
- What are the rules?
- Will there be admins and how many to help?
- How often will you post?
- What type of content will you post?
- What type of group will it be (ex: private, secret, public)
- What is the overall purpose of this goal? (i.e., does it support your business, your blog, etc)
- Do you have the time for a group? This is one of the biggest mistakes I see Facebook Group admins doing. They start a group, have lofty goals, and then after a few weeks, it falls out, the group is silent, and there is hardly any activity.
It took me two months of solid planning and strategy, research, and content creation before I even considered launching a Facebook Group. I am glad I put the work in because it is doing well. We have engaged members, and that is one of the keys to success of a Facebook Group: engagement over member numbers.
How to Start a Facebook Group: Ready to Launch
Head on over to your Facebook account. Click  in the top right of Facebook and select Create Group.
Enter the details of the group that you planned above. Set up the group preferences, enter the group name, add group members, and then choose the privacy setting for your group.
Click Create and Personalize with a Cover Photo.
The above are the actual steps to use for the create of a Facebook Group. Here are some things I recommend you do before inviting people in.
How to Start a Facebook Group: Hot Tips Before Inviting Members In
- Determine your rules. Store the rules in a Files document in the group and make a shortened bit.ly of that link. You can refer members to it when they join.
- Post a welcome message for the first week or two of your group launch. Pin the message and image/video to the top of your group.
- Run a tight ship: If you let members get away with all sorts of antics, the group will run itself right into the ground. For example, in the BlogPaws News and Boost Group, we have a Promote Yourself “thread” where members can promote something of their own as often as they want. This thread is posted Mondays and runs for the whole week. If every member of the group starting posting promotional information outside of that designated thread, the group would sound like an infomercial. Also, members of the group can search and find that thread and see what everyone has going on.
- If you have themed days, like Promote Yourself Mondays or Free-for-All Friday, be sure to outline this in your rules.
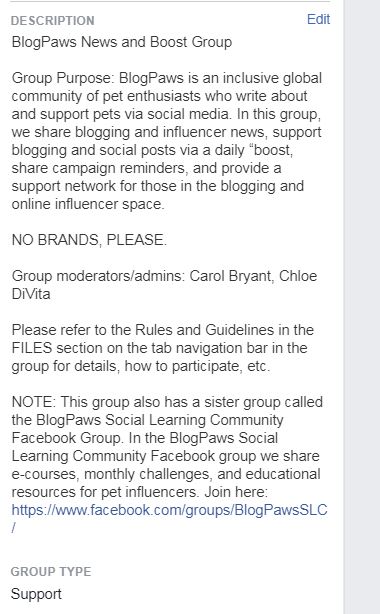
- Determine your group’s description and type. Here is the group description for BlogPaws News and Boost Group on Facebook. This is what potential members will see and describes the crux and type of group.
Do’s and Don’ts (Things I’ve Learned From Experience)
- DO engage in Facebook groups and join select groups in order to get a feel and flavor for what works and what does not.
- DO spend the time to plan your group following the instructions above. You’ll need this information to survive and thrive as a Facebook Group owner.
- DON’T add people without their permission to your group. This can be really annoying. There is a feature in groups where you can add people to your group. There is nothing more annoying than having someone add me to a group of which I have no interest. I leave.
-
DO have a plan on who you will invite, how, and goals for what members see on arrival.
- Don’t be alarmed if you see members adding members. If a members adds a friend to a group, a group admin may need to approve the request before they can join. Check your settings.
- DO pay attention to Facebook group insights, a recently added feature on Facebook.
- DON’T steal logos or other people’s work online to use in your Facebook group. Be original.
- DO consider adding a set of questions to ask potential members before you approve them for group membership. Group Admins can find the “Ask Pending Members Questions” option in their Group’s settings menu. This allows you to screen people. If they don’t answer questions, you can nudge them to do so or deny their membership.
- DO monitor group insights with engagement and growth to be sure you are on track and the group is performing in a way you desire. Make adjustments as necessary.
Don’t Stop Now
Besides starting a Facebook Group, there are many ways you can grow a Facebook following while keeping the engagement rate up. Discover these posts:
Using Facebook Ads to Target Specific Audiences
Why You Should Consider Facebook Advertising
How to Boost a Post on Facebook
Your Turn
What is your biggest challenge on Facebook? Are you a member of many/any Facebook groups? Let us know in the comments below and we will try and address your concerns and challenges!
Carol Bryant is the Marketing and Social Media Manager for BlogPaws and runs her own dog blog, Fidose of Reality and its fundraising arm, Wigglebutt Warriors. When not busy playing with her Cocker Spaniel, Dexter, she stays far away from cooking. Her trademark is her mantra and is tattooed on her arm: My Heart Beats Dog.®
Images: Kichigin / George Rudy / Shutterstock.com