How to Install Google Analytics 4 on WordPress
Beginning on July 1, 2023, Google Analytics 4 (GA4) will be the only option available for website owners to continue tracking their website traffic via Google Analytics. Universal Analytics (UA), the current version of Google Analytics, will retire. Though historic UA data will be accessible through UA for at least 6 months, the tool will completely stop collecting data on July 1 and will eventually be fully deprecated.
Do you own a business with a website in the pet industry? If yes, then I’m here to challenge you to tackle a small but mighty business goal before 2022 comes to a close – to get Google Analytics 4 installed and set up on your website(s).
Are you unsure how to install Google Analytics on WordPress?
If you’re ready to tackle this to-do list item, then let’s get started. For the average WordPress user, this setup process will only take about 15 minutes, so there’s no reason to put it off today!

Why You Need to Set Up Google Analytics 4 Today
If I haven’t already convinced you to get GA4 set up today, don’t worry. I have even more reasons to share. Depending on when you’re reading this article, the Google Analytics deadline is probably still a few months away. So why should you spend the time today to get it set up?
There are several reasons actually. First, if you get it done today, you get to cross it off your to-do list. Who doesn’t love the feeling of getting something off their plate?
Second, by getting it off your plate today, you don’t have to experience a stressful June 26-30, 2023 where you are panicking to fit the time to install GA4 on your website as the July 1 deadline closes in. You won’t have to imagine me sitting at my desk, casually clicking around in my own Google Analytics account, and trying really really hard to not say “I told you so.”
And third, if you want the real business reason, the sooner you get Google Analytics 4 set up and installed on your website, the sooner it will start tracking YOUR data.
Let me remind you that eventually, ALL Universal Analytics data will go away. You can download reports for your own records, but that data won’t be integrated into GA4.
If you set up GA4 today, then five years from now the oldest data you’ll be able to access through Google Analytics will be the traffic data from today. In a way, GA4 install day is like your site’s new birthday. Let’s get the party started and get this thing done!
How to Set Up Google Analytics 4 on WordPress
We are going to break down the process of how to install google analytics on WordPress into four sections:
- Preparing your site
- Creating your GA4 property
- Connecting GA4 to your WordPress site
- Confirming your data connection
In each of these sections, I will provide you with the step-by-step instructions that you need to take to get yourself to the next section. If you hit any snags along the way, please drop us a comment below or check out our free BlogPaws Community to ask your questions to other community members.
Preparing Your Site for Google Analytics 4
Step 1 – Before you do anything – ANYTHING – please take a backup of your website. This can be done through your hosting provider or a WordPress plugin like UpdraftPlus or BlogVault. It can also be done manually through cPanel or an FTP client.
No matter how you take your site backup, make sure it:
- Includes both files and a full database backup
- Is not located in the same space as your website
This means that if you use a backup process from your web host, then you should save that backup to an “offsite” location such as your personal computer or a cloud storage service like Dropbox or Google Drive.
You won’t be doing any serious coding in this tutorial, but we’ll all feel a bit better with a backup safety net just in case anything goes wrong.
Step 2 – Once you have your full backup, you are going to confirm that you do in fact have Universal Analytics and need to add Google Analytics 4.
If you’ve created your website between now and October 14, 2020, then it is likely that you already have GA4 ready to go.
If your site is older than October 14, 2020, then you will likely need to continue on to get GA4 installed.
The easiest way to check if you have UA or GA4 is to check your tracking ID. Log into your Google Analytics account. On the top left of your Google Analytics home page, you’ll see the Google Analytics logo. Just to the right of the logo, you will see “All Accounts” and the name of your Google Analytics property.
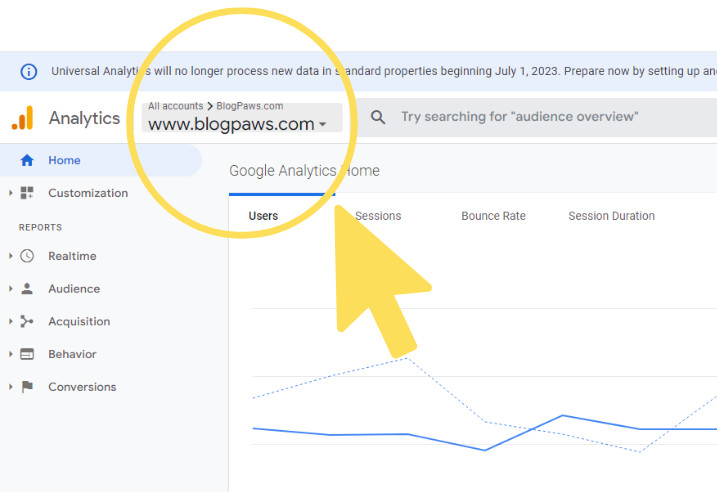
If you click on the property name, the window will expand and show an ID under the selected property name (it’s possible you might see more than one property here). If the ID you see has “UA-” at the beginning, then you have Universal Analytics.
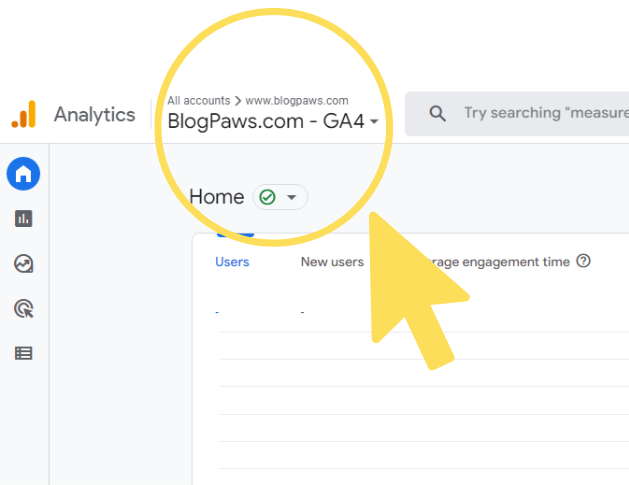
If you see a second property with the same name plus “- GA4” at the end, then you also have Google Analytics 4 set up. Click on that property and see if you are recording any traffic. If you aren’t or if you see a flag from Google, then proceed to “Connecting Google Analytics 4 to WordPress”.
If you don’t see that second property, then proceed to “Creating Your Google Analytics 4 Property”.
Creating Your Google Analytics 4 Property
Now that you have logged into your Google Analytics account and selected the tracking property that you want to create a Google Analytics 4 account for, we are ready to create the tracking code.
Step 1 – Click “Admin” or the little gear icon in the bottom left-hand corner of your Google Analytics home page.
Step 2 – Under “Property”, click “GA4 Setup Assistant” and then click “Get Started” under the option to create a property.
If you are already using the gtag.js code snippet, then you will have the option to enable collection with your existing tag. If you get this choice, great! This means you get to skip “Connecting Google Analytics 4 to WordPress”.
If you don’t get this option, don’t worry. You are still super close to setting up your new GA4 Property.
Step 3 – Click on “Go to your GA4 Property”, then “Data Streams”, and select “Web”.
Your website information should be viewable at the top.
Step 4 – Scroll to the bottom and click on “View Tag Instructions.”
This will take you to a page with a few different options to install Google Analytics on WordPress. If you are using MonsterInsights or another one of the tools listed, select the tool you are using, skip “Connecting Google Analytics 4 to WordPress”, and follow the instructions shown on-screen.
If you are not using a listed tool or plugin, click “Install Manually” and copy the code that is shown to you on the next page. Then proceed to “Connecting Google Analytics 4 to WordPress”.

Connecting Google Analytics 4 to WordPress
If you have made it this far, congratulations! You’re nearly there.
Now you need to put the code you copied from the previous step into the <head> of your website. There are several ways to do this, so select the best option for you and your website.
Option 1 – Add the code to your Theme Settings in Customize.
This option is the best one if it is available to you, but its availability depends on the theme you are currently using. This option is common for themes built on the Genesis Framework.
From your WordPress dashboard, click on “Appearance” and then “Customize” in the left navigation bar.
On the new page, select “Theme Settings” and then “Header/Footer Scripts”.
Copy your code into the “Header Scripts” text box, making sure to not remove anything that is already there, and hit publish.
Option 2 – Manually add the code to your header.php file
This is an option for those who are more tech and code savvy. If you have a child theme, make sure to make the changes there instead of the parent.
If you have a theme that is regularly updated, then consider using option 1 or 3 to avoid updates overwriting your Google Analytics code.
From your WordPress dashboard, click on “Appearance” and then “Theme Editor” in the left navigation bar.
Check that your current theme is listed in the top right drop-down. If not, select it and then click “Select”.
Select “header.php” from the file list on the right side. Find “<head>” in the code and copy your Google Analytics code immediately after it.
If you don’t see this file listed, then try options 1 or 3.
Option 3 – Adding your code with a WordPress plugin
If neither of the first two options work for you, then you might want to consider using a plugin to install Google Analytics on WordPress.
Some options to consider include WPCode, MonsterInsights Lite, and ExactMetrics.
To install these plugins and connect your site to Google Analytics, follow the instructions provided by the plugin.
Confirming Data Collection
Now that you have Google Analytics set up and installed on your website, you’ll want to confirm that everything is working correctly.
To do this, return to your Google Analytics home page and make sure you are viewing your new GA4 property.
Navigate to “Reports” and then “Realtime” on the left side.
Then visit your website in a private or incognito browser and start clicking around. Within a minute or less, you should see traffic starting to pop up on the Realtime report. If you do, you are all set!
If not, then you’ll want to walk back through the steps above and make sure everything is properly connected.
Moving Forward with Google Analytics 4
Google Analytics has become the industry standard tool for collecting web traffic data and GA4 is the future of Google Analytics. If you want insight into who is visiting your site, why they’re visiting, what brought them there, how long they stayed, and more, switching over to GA4 now is in your own best interest.
Though change can be intimidating and challenging, switching over to Google Analytics 4 will give you a heads up on the competition as you can start to learn the new user interface and start setting up your customizations including events and conversions.
Hopefully, this article has convinced you to get GA4 set up on your website as soon as possible and helped guide you through the installation process. If you have set up Google Analytics 4 on your website already, leave us a comment and let us know! We can’t wait for our entire community to join the GA4 Fan Club.
About the Author: Jessica Shipman, BlogPaws COO / CMO, has been in the pet industry since 2013, following the launch of her blog, Beagles & Bargains. She’s a skilled marketing strategist with an Ivy League Engineering degree making her a sought-after web developer, too. When not focused on content creation or SEO, she enjoys spending time with her two dogs, Luna and Ralph. Read more…


One Comment