All About Google’s New Email Sender Guidelines For 2024
In October 2023, Google announced new email sender guidelines for bulk senders to Gmail accounts. They call these “Email Sender Guidelines,” and while Google titles them “guidelines,” they make it clear that these are requirements.
There is a lot to unpack here.
First and foremost, while Google states this applies to bulk senders (anyone who sends 5,000 or more messages per day to Gmail accounts), we recommend that anyone who sends bulk emails for their business follow these guidelines. This includes those that may not yet fit the bulk sender definition.
These guidelines go into effect on February 1, 2024, and implementing them now will help protect your email marketing authority.
Here are the questions that we’ll cover in this post:
- What are the new email sender guidelines?
- Why are they important to implement?
- Do they affect any other email accounts? Like Yahoo or Outlook, etc.?
- What should I do if I don’t send 5,000 emails per day?
- What should I do if I do send 5,000 emails per day?
- How do I authenticate my email domain?
- How do I create a DMARC Policy?
- What is the best DMARC Policy code to use?
- What is an XML report, and what do they tell me?
- How do I get help implementing these new email guidelines?
Keep in mind that while these guidelines come from Google and are specific to Gmail accounts, every email server runs code to determine whether your emails belong in spam and to help prevent spoofing and phishing. Yahoo has already announced similar guidelines. By taking these steps, you are helping to protect your emails for every server, not just Google.
What Are the New Email Sender Guidelines?
There are three main sections to the new email guidelines. The most involved is the one regarding authentication. The unsubscribe and spam rate guidelines are simply now more defined but were already considered “best practices.”
- Authentication. This means your email-sending domain has the proper code in your DNS settings for the receiving server to check and ensure the emails are actually coming from you. For us, that means we update our blogpaws.com domain’s DNS setting with the code provided by our ESP (email service platform). Think of it as showing your ID at the door to “authenticate” that you are who you say you are. More on that below.
- Easy unsubscribe. This is something that everyone should already have: an easy way for subscribers to unsubscribe. Google went further with this and has defined it as “one-click unsubscribe.” For bulk senders, you need a special code in your header for this, and you cannot send people through hoops to unsubscribe. When they click “unsubscribe,” they need to go straight to where they can easily remove themselves from your mailing list.
- Spam rates. If you always send to people who have opted-in to your emails, this should be easy to follow. Aim to keep your spam rates below .10% and never go above .30%. Be sure you are monitoring your spam rates in your ESP.
The most critical part of these guidelines is the email authentication piece. Therefore, that will be the part we focus on most here. But we’ll briefly touch on the importance of the other policies.
Why Are the Email Guidelines Essential to Implement?
The digital world is growing and changing at a nearly unimaginable speed. Guidelines that help us – the small business owners – stay ahead of the hackers, spammers, and phishers become more critical so that we can continue to grow and reach our people.
As small business owners in the pet industry, we are driven by passion. That passion has so much value to us and the world. That passion and dedication to your business probably has you already ensuring your email marketing includes an easy unsubscribe option and low spam rates.
That passion does not protect you against spammers, spoofers, phishers, hackers, and the ruthless people who attack us in a digital form.
Following these guidelines, specifically, the one about authenticating your email domain helps protect you from the wrong people pretending to be you through emails. It helps to raise your authority with all email servers and ensures that as your email list grows, you have all the proper pieces in place to land in your subscribers’ inbox as often as possible.
Email marketing is not going anywhere. In fact, it’s one of the best ways to build and communicate with your community.
If you are new to email marketing, here is a list of our email marketing content to help you conquer your goals.
Do These Guidelines Affect Any Other Email Accounts? Like Yahoo or Outlook, Etc.?
Yes.
However, we can’t say exactly how. Every email server runs its own code to determine whether your email will make it to your subscriber’s inbox. Yahoo shared their “Best Practices,” which also go into effect in February 2024.
It is safe to say that adding this code will help you with your email authentication across the board.
What Should I Do if I Don’t Send 5,000 Emails per Day?
There are two ways to answer this question. First, there is what you are required to do. Then, there is what we recommend you do. Previously, we have discussed guidelines about unsubscribes and spam rates on our blog, so we will focus on the authentication piece.
You must authenticate your email-sending domain by implementing SPF and/or DKIM. In your ESP, this is most likely called “verifying your sending domain.”
We recommend you also create a DMARC Policy and take the steps to get up to speed with the requirement for larger sends now. Don’t wait.
If that sounds as clear as mud, don’t worry. We explain how you do both of these authentication steps below.
What Should I Do if I Do Send 5,000 Emails per Day?
If your list is 5k or more, or if you reach the 5k sends per day limit from a smaller list by sending many emails, you must do the full authentication protocol.
You must authenticate your email-sending domain with SPF and DKIM and create a DMARC Policy.
Plus, you need to include an easy unsubscribe right in the header of your email.
See the complete list of requirements from Google here.
Again, the spam rate requirements should be guidelines you are already following, but if (for any reason) you are not, it’s time to follow those, too.
How Do I Authenticate My Email Domain?
You should be able to do this in your ESP. Most, if not all, have an easy-to-find clickable link labeled something like “verify your domain.” They should also have some help articles to guide you through the steps.
The basics of what needs to be done should involve the following:
- Get a specific code for SPF and DKIM records from your ESP.
- Put those SPF and DKIM records into your DNS settings.
- Run a test to ensure they are set up correctly. We have used this simple checker, but there are many out there.
Getting the code is pretty straightforward, but if you are unfamiliar with editing your DNS settings, you may want some assistance. Most hosts will happily help you with this process if you ask for assistance.
NOTE: Your DNS settings can only have one SPF record. That means that if you have more than one place you send emails, which most of us do, you need to merge your SPF records into a TXT record in your DNS settings.
You can have as many DKIM settings as you need, and you will need one for every service you send email through.
For example, we use Google, Convertkit, Circle, Stripe, and WordPress. That means one merged SPF record with the code from each of those services and a DKIM record for each of them, too.
Don’t be afraid to ask for assistance on this!
How Do I Create a DMARC Policy?
DMARC stands for Domain-based Message Authentication, Reporting, and Conformance. It’s code that creates a policy for your business’s email deliverability.
This is a fancy way of saying that having a DMARC policy allows any email server that receives an email from you to know exactly what to do with the email based on whether it passes authentication.
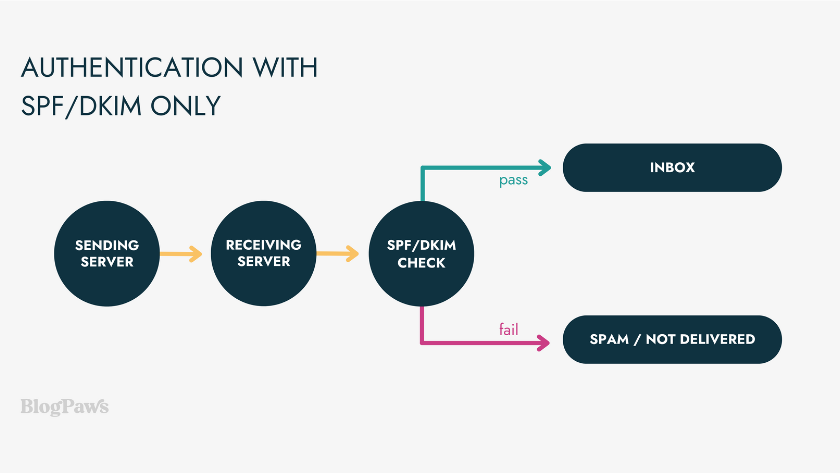
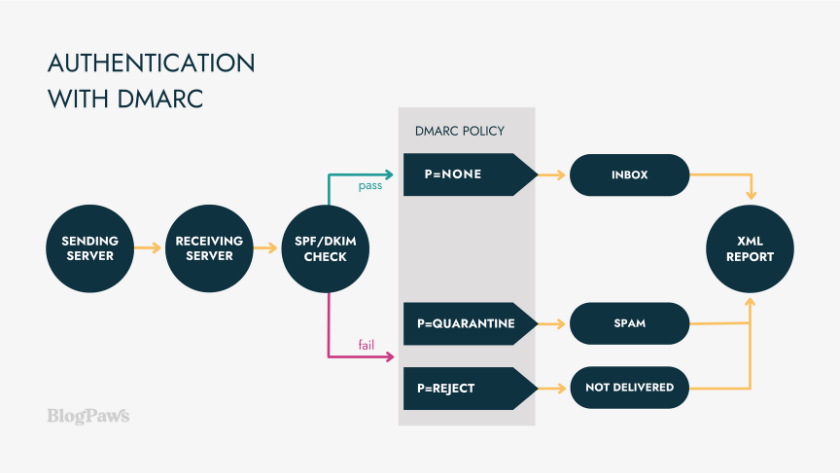
Here is a visual of what email authentication and delivery look like, both with and without a DMARC policy.
Without a DMARC policy, you would be unable to get any information back about whether or not your emails are being delivered properly.
DMARC is another text code you need to add to your DNS settings, and you only need it once. Your DMARC policy code will apply to all emails you send, regardless of where the email originates.
DMARC is code that you simply need to generate. It is not done via an ESP or your host. Many sites offer easy DMARC code generation, but we don’t have one to recommend because we followed Google Workspace’s Help Center.
Google breaks down how to Define Your DMARC Record here.
What Is the Best DMARC Policy Code to Use?
When choosing whether to use p=none, p=quarantine, or p=reject, we recommend starting with p=none.
If DMARC is new to you, it’s helpful to get familiar with the process and start to learn how to read the XML reports you will receive first.
After you start to understand the information in the reports and feel confident with your process, you can change to p=quarantine or p=reject. The choice between those should be based on what you plan to do with the information.
In other words, if you choose p=reject, you should be reading your XML reports to see what emails are being rejected. You need a plan for how to address the rejected emails so that you can try to prevent the rejection.
If you have no plan to review the XML reports and make decisions based on the emails you are sending, and why they may not pass the SPF/DKIM check, then you should probably choose p=quarantine.
Choosing p=quarantine will at least put the email into the spam or junk folder, which means you can fall back on saying, “Did you check your junk/spam?”
When you choose p=none, you leave it up to the receiving email server to decide what to do with the email. Just because it passes and does not get flagged as spam does not mean it will end up directly in your subscriber’s inbox.
Many email servers now utilize folders like “other” or “focused” or Gmail’s famous “Promotions” and “Social” folders. Just because your email passes the SPF/DKIM authentication does not mean it won’t end up in one of those folders. But it does mean you can learn to read your XML reports and start to learn how each server treats your emails.
Be sure to include rua code in your DMARC policy to control where emails are sent. It will look like this: rua=mailto:youremail@yourdomain.com.
A full DMARC policy might look something like this:
v=DMARC1; p=none; rua=mailto:email@domain.com;
What Is an XML Report, and What Do They Tell Me?
Once you have DMARC set up and working correctly, you will begin to receive reports about the emails you are sending. These reports come in XML format; each receiving server will send one.
That means if you send out an email newsletter and have people on your list that use Gmail, Yahoo, MSN, AOL, and Outlook, you will get at least 5 DMARC reports.
Some businesses are likely to receive significant amounts of reports each and every day.
We recommend either setting up a special email account to receive the reports or creating a filter into which all the reports can go.
There are also third-party services that process the reports into a more readable format.
Britt, the BlogPaws Director of Content & SEO, uses a free account on Valimail. It walks you through the steps to easily set it up and displays all the information from your XML Report in its dashboard in an easy-to-understand format.
How do I get help implementing these new email guidelines?
If you need assistance to get these new codes in place, first reach out to your host. They have direct access to your DNS settings, and as long as you can get them the proper codes, they can set it up for you.
Don’t forget to test that everything is working!
If you need someone to help you with all of it, we can help. We can walk you through the process during a private coaching call. It’s a great choice if you don’t want to share all your login information with someone, and you can learn the basics of email authentication and editing DNS settings!
Have you already gone through the email authentication process? If so, do you have any tips to share with those just starting?
About the Author: Chloe DiVita, BlogPaws CEO, has 15+ years of experience in digital marketing, the pet industry, and as a greyhound mom. She’s earned accolades like, Pet Age’s 40 Under 40 and Muse Medallions from the Cat Writers’ Association. Formerly Executive Producer for TEDxCambridge, she brings storytelling and public speaking to her work with creators, leaders, and brands. Read more…


