4 Simple Tricks to Photograph Your Pet Like a Pro
For pet bloggers, taking great images of our pets is a key component to blogging success. Unlike with human models, it’s not always easy to get your pet to strike the perfect pose for that eye-popping photo. It takes a bit of creative maneuvering to get a photo of your pet that looks like it was taken by a professional photographer. These simple photography tricks will make people wonder if your pet photos were taken by a professional photographer!
Earlier this year, BlogPaws 2017 Ambassador and speaker Robin Mudge shared her secrets to capturing the perfect pic of cat models in How to Take Irresistible Cat Photos for Your Blog. Today, another BlogPaws 2017 Ambassador, Cathy Armato, shares her tips and tricks to photo your dog like a pro. One thing to note: Both posts have tons of awesome tips and tricks that work for any pet: dog, cat, hamster, horse, snake, ferret, and more!
Places, Everyone!
Move your dog into position by using treats and toys to lure him to the right spot and get the facial expression you’re looking for. Dogs follow their nose, so place a treat close to his nose and slowly lure him around to the spot you want him in. Reward with the treat and give the “stay” command. Continue using a treat to lure your dog for any minor position adjustments needed.
Once he is in the perfect position, the easiest way to get him to look at the camera is to squeak a toy and be ready to snap the photo immediately. Dogs will naturally turn towards noise. Your dog may ignore the sounds you make yourself, but they rarely ignore the sound of a favorite squeaky toy! Be sure to use the “stay” command so he stays in position as you squeak the toy.
Say Cheese!
Some of the most adorable photos of dogs show them “smiling.” You might be wondering how to get your dog to do that. Smiling is just your dog engaging in one of his natural behaviors: panting! Dogs usually start panting after a short walk or some brief play time. Right before your photo session, take your dog for a short walk or have a quick play session in the living room. It only takes a few minutes for your dog to start panting, which he does in order to keep himself cool. When your dog starts panting, grab your camera and start snapping those photos! Keep a bowl of water close by in case he needs a drink first. Of course, you don’t want to overheat your dog. Just a few short minutes of mild exertion is enough to get most dogs smiling.
Give It Some Depth and Dimension
Pretty backdrops are a great way to add interest to your pet photos. I love using them, but I like to add even more interest by creating depth. Adding props to photos can add great depth and dimension, making them pop. You don’t want to overshadow your dog with too many props; you want just enough to draw the eye forward and make the photo pop. Keep it simple, relevant, and curated. Don’t use too many large items.
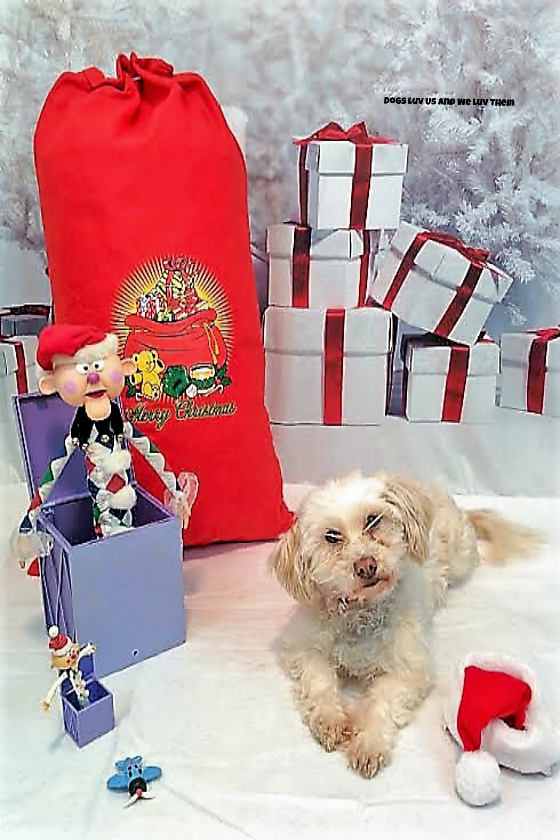
This Christmas photo of Phoebe was nice with the holiday-themed backdrop, but adding a few simple props gave it more interest and depth. Santa’s sack gave it some dimension, but when I added the Jack-in-the-Box, the smaller Jack-in-the-Box, and the tiny airplane toy all cascading out from Santa’s sack, it provided even more dimension and depth. The eye is drawn out from Santa’s sack on through to the airplane. The props also add to the Christmas theme without overwhelming the photo.
Turn Your Back on Me
Sometimes you want to get a shot of your dog’s back, but you also want your dog’s face in the photo. You want him to have his back turned towards you, looking over his shoulder at the camera. This is an adorable shot. It’s really helpful with Halloween costumes and other apparel you want to photograph from behind to capture the detail of a garment.
First, get your dog into position using a treat or toy as a lure and give the “stay” command. You then want to move behind him to take the photo without your dog shifting his entire body towards you. You want him to follow the treat you’re holding with his head. You may need to work on this slowly. Start by moving just a foot or so to his side and reward with a treat when his head and gaze follow you but his body doesn’t. Repeat the step, each time moving further to his side and ultimately moving a few feet behind him. Train your dog to do this before you need the photo; you don’t want to be rushed to get the right shot.
TIP: If you’re shooting with a wall as the background, don’t make your dog face too close to the wall. Many dogs are uncomfortable facing too close to a wall and may resist staying in place. Position him further away from the wall so he isn’t uncomfortable with the proximity.
These four dog photography tricks will have people wondering “Did she take those photos herself, or did a professional pet photographer take them?” Only your dog knows for sure!
Learn more: Getting the Most Out of Your Phone for Photoshoots
Cathy Armato is a freelance writer and pet blogger. She is passionate about the human-animal bond and animal welfare issues. Her blog, Dogs Luv Us and We Luv Them, focuses on pet health and well being, pet safety, traveling with pets, and animal welfare. Cathy is a lifelong animal lover and animal shelter volunteer. She fosters dogs in her home and volunteers in her community with her Therapy Dog, Icy.
Images: Annette Shaff/Shutterstock.com and courtesy of the author




One Comment