How to Set Up Google Analytics in 3 Easy Steps
“Some of the best things in life are free.”
Usually people only say that to help them forget that they can’t afford that one awesome thing they’ve always had their eye on (I’ll have you yet, iPhone X!). But in the world of online marketing, not just some but many of the best things are free. Software, tools, plugins—you name it. But out of all those free resources, one reigns supreme: Google Analytics.

What is Google Analytics?
Google Analytics is one of the most powerful data collection and tracking tools available, and it’s literally a must-have for almost any website. Just about any activity that a person may do on your website—visit a page, jump across multiple pages, click on a button, submit a form, and so on—can be easily tracked with a Google Analytics account. We could create an endless list of reasons why data like that is valuable to just about any webmaster—particularly those that plan to monetize their sites.
Along with “free” and “powerful,” you can also add “easy to use” to the list of Google Analytics’ myriad benefits. It only takes a few minutes and minimal tech skills to unlock a world of actionable traffic data. It’s so easy, in fact, that you can do it by just following these simple steps.
Please Note: This is just a bare-bones, straight-to-the-point explanation of how to set up Google Analytics. The more detailed stuff will be explained in a follow-up post.
Step 1: Create a Google account
Before you get started, you’re going to need to set up an account with Google—in other words, a Gmail account. A basic Gmail account is an all-access pass to most of Google’s products, so having one is imperative for anyone aiming for a successful web presence.
If you already have a Gmail account, you can use that. Same goes for G Suite or any of Google’s small business solutions. If you don’t have any of those (or you’d rather create a new account dedicated to your Google Analytics activity) then you’ll want to create a new account by going here. <link: https://accounts.google.com/SignUp>

Signing up is pretty straight-forward. Fill out all the information asked of you and click the submit button. When doing this, though, be sure to use your primary phone number and an email account you check often. If you ever lose your password—or worse, get hacked—these will be your lifeline.
Once you’ve submitted your info and accepted terms and conditions, you’ll land on a page full of options for customizing your account. You can ignore that for now as none of it is directly connected to Google Analytics. But definitely take the time to come back and check it out later!
Step 2: Set up a Google Analytics account
Once your Gmail account is set up, you’ll be ready to set up your Google Analytics account! The first step is to go to the login page: https://analytics.google.com. There are several different flavors of analytics that Google offers on page; we’re only interested in the one labeled “Analytics.” You’ll see it as the first option when you click the “Sign In” button. Once you click on it, enter in the login credentials to your newly created Gmail account and you’ll land on the account setup page.
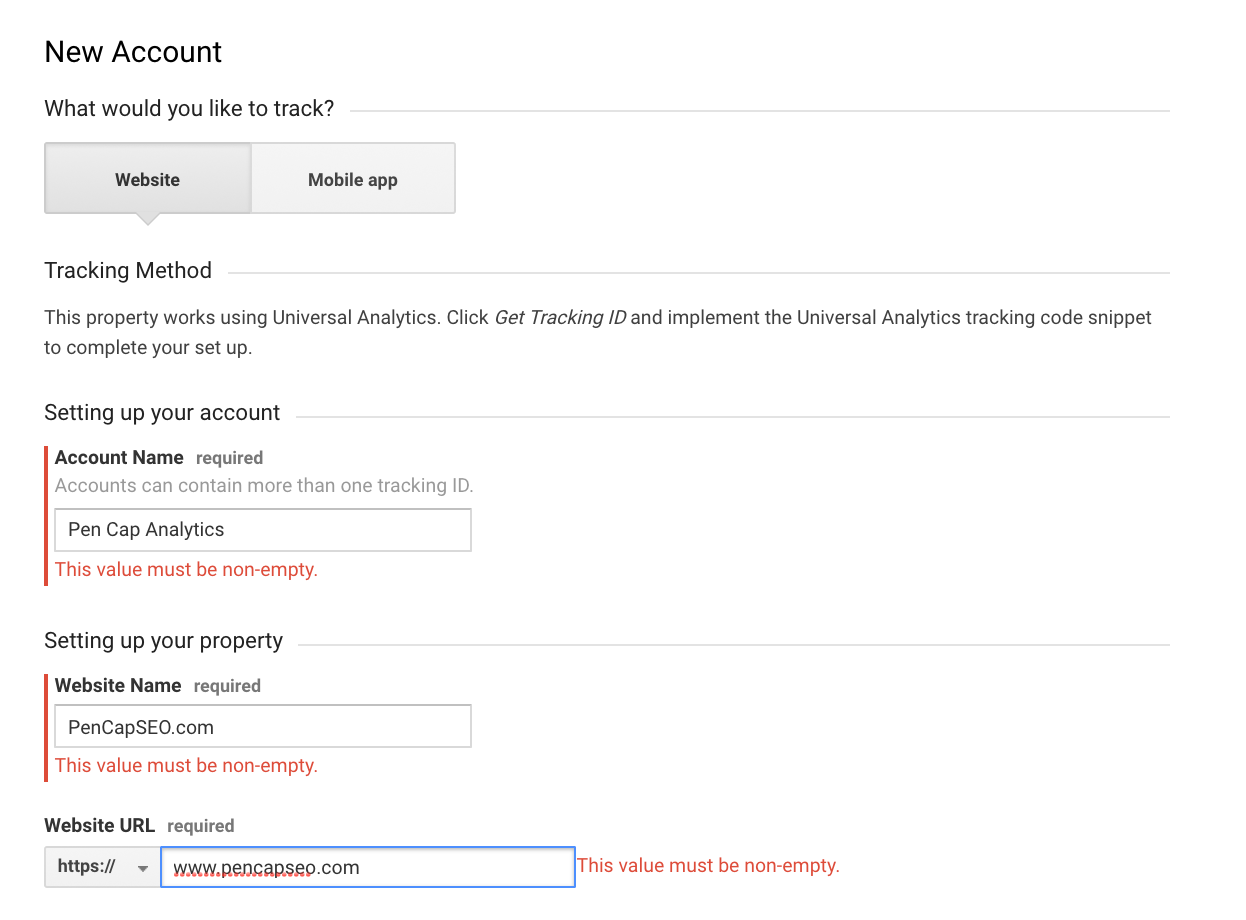
On this page, you’ll find three primary fields to complete: Account Name, Website Name, and Website URL.
Account Name is the label for your entire account. You can set up Google Analytics for multiple websites under just one account, and the name you choose here will be the name for that umbrella account.
Within each account, you’ll have several properties. If you have multiple websites you want to track, each website would have its own property within your account. For this walkthrough, though, let’s assume you only have one website and therefore only need one property. This is where the Website Name field comes in. You can name this whatever you’d like, such as “YourSiteName.com” or “Your Site Name” or just about anything else. My suggestion is to use a name that’s similar to your website so it’s easy to associate.
(Note: You may want to familiarize yourself with the hierarchy of Google Analytics. You can do that by checking out Google’s documentation.)
Finally, we have the Website URL field. Here, you’ll list the actual URL of your website. Make sure you specify whether your website is an “http” or “https” site, as entering the wrong one could cause tracking errors. The same thing goes for www. If set up correctly, your site should automatically redirect to either a “www” version (http://www.example.com) or a non-www version (http://example.com). Make sure you enter the correct one in this field to ensure accurate tracking.
Beyond these fields, you’ll see a bunch of sections with check boxes. For the sake of simplicity, I suggest leaving those checked in, as recommended. When you’re done, hit the “Get Tracking ID” button—we’re almost finished!
Step 3: Add your tracking code
Now that you have your account set up, it’s time to add the tracking code to your site.
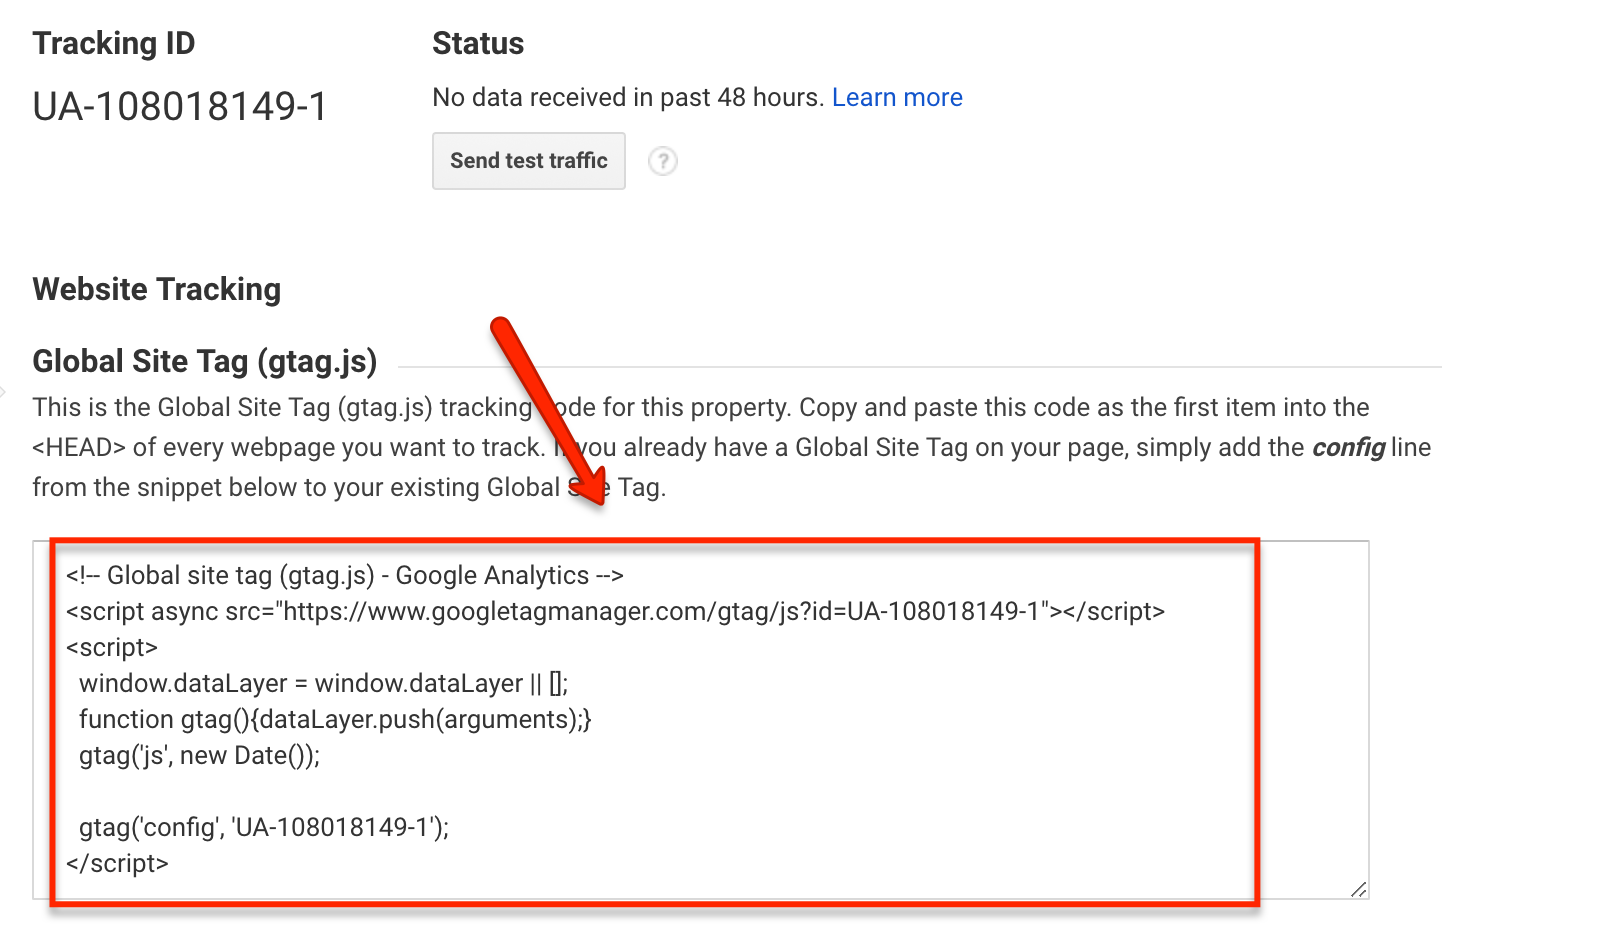
You may be asking, “What does this code do?” This code is how Google Analytics knows your site is…well, your site. Every time a page on your site loads it will trigger this code, which then sends information back to Google Analytics to report back to you! That’s an oversimplification, but it covers the gist of it.
So, how do we make sure this is implemented correctly? It needs to be added to the <head> of every single page on your website. Not sure what the <head> is? That’s OK! There are a number of ways to easily implement the tracking without touching a line of code on your site.
If you’re using a WordPress site, one of the easiest ways to do this is by adding a plugin. One of the most popular is MonsterInsights. It’s free, easy-to-use, and doesn’t require technical skills beyond knowing how to copy and paste. Simply install the plugin, follow the directions, and you should be golden!
If you’re not using WordPress or you’re not comfortable with adding plugins, don’t worry: Many hosting providers—such as GoDaddy, BlueHost, and Host Gator—offer easy ways to add this for you so you don’t have to do it yourself. If your hosting provider doesn’t offer that service, then a developer could help you with it. And if you don’t have access to a developer, then email me and I’ll be happy to help (it usually only takes a minute or two, so I don’t mind).
All done!
And that’s it! That’s all there is to installing Google Analytics. Now that you have it in place, you’ll have a wealth of actionable traffic data at your fingertips.
Of course, setting it up is just the tiny tip of the iceberg. There is a ton of other simple tricks and fixes you can do to get even more detailed information about your site, and we’ll be covering that in a future post. In the meantime, have fun!
Michael Ferrari owns and operates Pen Cap Online Marketing, an agency specializing in search engine optimization. When he’s not helping businesses dominate the search rankings, he’s most likely hanging out with his wife, son, and beagle. You can reach him at “michael(at)pencapseo(dot)com”.
Images: hedgehog94/Shutterstock.com and screenshots courtesy of the author